DIY Guide: How to Install New Handlebars on Your Motorcycle
Aug 8, 2024
Thinking about upgrading your motorcycle’s handlebars? Whether you’re aiming for more comfort or a stylish ride, new handlebars can make a big difference. Riders often replace handlebars to better suit their ergonomic needs and personal preferences. But how do you pick the right handlebars, and what are risers on a motorcycle? This post will guide you step-by-step on how to install motorcycle handlebars, including a source on how to install handlebar risers if they fit your setup.
Proper installation enhances comfort, control, and stability. Here’s a DIY guide to follow:
First, Choose the Right Handlebars
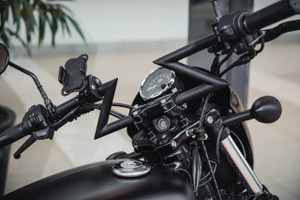
When selecting the right handlebars for your V-twin cruiser motorcycle, consider your riding style, comfort preferences, and the overall aesthetics of your bike. It’s essential to select handlebars that look great and provide the best riding experience for you. For instance, for V-twin cruiser motorcycles:
- Ape hangers provide a relaxed cruising stance
- Buckhorn handlebars offer comfortable and natural wrist angles
- Drag bars offer a lower and more aggressive riding position
- Beach bars offer a relaxed riding position with the hands slightly above the risers
Before you learn how to install motorcycle handlebars, be sure that the handlebars are compatible with your motorcycle model and match your preferred riding style. This means checking the fitment, selecting handlebars that match your riding style, and testing the ergonomics to simulate the riding position.
Preparation and Getting the Right Tools
Before you start installing new handlebars on your motorcycle, it’s important to get prepared and get the right tools and parts to help you save time, avoid any mishaps, and streamline the installation process. Here’s a list of parts to guide you:
- Wrenches: These are essential for loosening and tightening bolts. A good set of metric and standard wrenches will be useful.
- Screwdrivers: Both flat-head and Phillips screwdrivers will come in handy for various screws on your bike.
- Allen wrenches: Also known as hex keys, these are necessary for many handlebar-related components. You’ll need to know how to identify what components to remove before learning how to install motorcycle handlebars.
- Socket set: A comprehensive socket set can make removing and installing parts easier.
- Torque wrench: This ensures that bolts are tightened to the correct specifications without overdoing it.
- Handlebar grips: These might need to be replaced along with the handlebars.
- Handlebar risers: Depending on the style and height of your new handlebars, risers may be required. You need to know what risers are on a motorcycle and how to install handlebar risers before purchasing.
- Brake and clutch levers: If your existing levers aren’t compatible with the new handlebars, you’ll need new ones.
- Cable extensions: For taller handlebars, consider if you need longer throttle, clutch, or brake cables.
Step-by-Step Installation Guide
Learning how to install motorcycle handlebars doesn’t have to be a daunting task. With these clear steps, you’ll be back on the road in no time.
Removing Old Handlebars
First, you need to remove your old handlebars. This involves disconnecting electrical components and brake lines. Follow these instructions to get started:
- Disconnect Electrical Components: First, turn off the ignition to ensure your bike is off for safety. Then, carefully disconnect any electrical connectors attached to the handlebars.
- Disconnect Brake Lines: Place a towel or rag around the brake reservoir to catch any spills. Gently disconnect the brake lines. You may need to use a wrench.
- Remove Handlebar Clamps: Use a socket wrench to loosen and remove the bolts holding the handlebar clamps in place. Lift the old handlebars off the bike and set them aside.
Removing components carefully is the first step to mastering handlebar installation.
Installing New Handlebars
Once the old motorcycle handlebars are off, how do you install the new ones? Correctly routing cables to the appropriate areas is essential for a smooth installation.
- Mounting: Position the new handlebars on the mount. Reattach and tighten the handlebar clamps to hold the handlebars in place. Ensure they are snug but not overtightened. You’ll need to consider how to install handlebar risers as well if you’ve chosen that mode of customization.
- Routing Cables: Route the throttle cables, brake lines, and electrical wires along the same path as the old ones. This prevents any stretching or pinching. Ensure there are no sharp bends or kinks in the cables. Everything should move freely. This is a vital step to focus on when learning how to install motorcycle handlebars, as it ensures there are no loose wires that could cause safety risks when riding.
Reattaching Controls and Components
Next, you’ll need to reattach the controls and other components to your new handlebars. This includes installing grips, levers, switches, and mirrors.
- Install Grips and Levers: Apply a little soapy water or a special grip adhesive to slide the new grips on. Attach the brake and clutch levers. Tighten the mounting screws securely.
- Reconnect Switches: Screw the electrical switches back onto the new handlebars. Ensure they’re tight and wires are not exposed.
- Mount Mirrors: Reattach the mirrors. Make sure they are adjusted to your preferred viewing angle.
Final Adjustments and Test Ride

Now that you know how to install motorcycle handlebars, it’s time to make some final adjustments and take a test ride to ensure everything works as it should.
- Check Handlebar Alignment: Sit on the bike and make sure the handlebars are aligned straight and feel comfortable. Double-check that all bolts are tight and secure.
- Test Ride: Take your motorcycle for a short ride to test the new handlebar installations feel and handle. Make sure all controls, switches, and brakes function properly. Listen for any unusual sounds and check if all components are operating smoothly.
By following these steps, you’ll have your new handlebars installed correctly, giving your motorcycle a fresh look and improved comfort. Now you know how to install motorcycle handlebars like a pro.
Enjoy Your Ride
After everything is set, enjoy your newly upgraded motorcycle. Feel the difference in control and comfort, whether you’re on a city ride or a highway journey on your Harley-Davidson, Indian, or Yamaha V-twin cruiser. Upgrading handlebars adds a personal touch and improves safety. Whether you’re learning how to install handlebar risers or motorcycle handlebars, or are just curious about what components like risers are on a motorcycle, West End Motorsports is here to help you.
Explore our selection of aftermarket handlebars for various V-twin motorcycle models. Upgrading your handlebars is just the start. Our wide range of aftermarket parts and accessories caters to all your upgrade needs. Discover something new at our online store—your next project might be even more thrilling.


